Monday, January 28

Roasted Balsamic Glazed Salmon

For a while now I've been craving a teriyaki glazed salmon,
  unfortunately for me I didn't have the right ingredients. 

However, a few weeks ago my father in law gifted me a set (which included Wine, olive oil & a balsamic vinegar). My inner light bulb went off! Not knowing what the outcome would be, I began searching the web for balsamic glazed salmon recipes. Soon enough I came across this one, I altered the glaze a bit using less than half the amounts called for. For me it came out just perfect, the right amount of glaze, not over powering the actual salmon. The balsamic makes the salmon somewhat sweet, it slightly resembled a teriyaki flavor. Although not as sweet. Hope you enjoy this as much as we did. 
My youngest isn't very fond of salmon & she loved it.

RECIPE:
3-4 Salmon Steaks (1 per person)
Salt & pepper
Olive oil

Pat Salmon steak dry & drizzle olive oil & salt/ pepper. Set aside. Now let's prepare the glaze!

Balsamic Glaze:
1/4 cup Balsamic Vinaigrette
1 Tb Maple syrup
1 Tb Dijon mustard
1 garlic clove (minced)

Place all ingredients in a small sauce pot & simmer on low for 10 mins. Allowing the favors to combine & sauce to thicken. Stir frequently because the sauce can easily burn.


Place salmon on a baking sheet. Spoon sauce onto each piece, covering the top of the salmon. Bake Salmon at 375 degrees 15 minutes (depending on your oven). Until the side of the salmon looks thoroughly cooked.


Take out & serve! (Serve over rice & your favorite veggies.. 
(If your eliminating carbs from your diet, serve directly over veggies. Remember salmon packs a good nutritional value.) 

I also roasted green beans (salt/pepper, olive oil & roast for 12 mins). & roasted garbanzos (click the link) for a how to. http://www.shesohungry.blogspot.com/2013/01/roasted-garbanzo-beans.html


Topped with roasted garbanzos.. a little something extra!


ENJOY!! 

Below is the link to the original recipe, I altered it a bit.

Roasted Garbanzo Beans

I came across this recipe today & I had to try it!
 So yummy! Perfect snack, next time I'm tripling the recipe & adding Tajin at the end! ;)
BTW: My girls loved it!

RECIPE:
1 can of garbanzo beans
Extra Virgin Olive oil
Pinch of Sea Salt

Open a can (or 2 of garbanzo beans) drain, rinse & peel.

Pat dry & arrange on a baking sheet.


Lightly drizzle some olive oil & roast at 350 degrees for 45 mins.


Take out of the oven & season with Sea salt or your favorite spice.


Enjoy!!

Saturday, January 26

Egg Cupcakes

You don't need a plate nor fork! 
Eat them at home or on your way to work! That's the beauty of these! Give them to your kids in the morning on the way to school! Do you have a brunch to attend? Make these & transport them with no problems!
Can you tell I love eggs? haha

RECIPE:
6 eggs
1 potato (chopped small)
1 Jalapeno (diced) *optional
1 Tomato (chopped)
2 slices of onion (diced)
Colby cheese
Salt & Pepper

{Makes about 8 cupcakes} Depending on the eggs you use, you'll get 2 or so extra.
Eggs & potatoes are always a match made in heaven. Play around with your own ingredients.

Pre heat oven at 350.
Heat up a large skillet, add olive oil & potatoes. Cover & cook until tender. This may take a while. Finally add onion & tomato. Cook for another 3 mins. Turn heat off! Set aside!
In a bowl combine eggs, a splash of milk, & a bit of cheese.
Butter about 8 cupcake molds!
Add egg mixture to your skillet & combine.
Begin filling each cupcake mold & top with cheese. If your adding jalapeƱo remember which ones! Bake for 15 mins. Until golden. Take out of the oven & allow to cool!

Tip: Add anything you want to these, cooking steps are the same!!

Enjoy!!

Friday, January 25

Tamales: Rajas (Green Chile & Cheese)


OK! I hope you guys are excited.. we're making tamales!!! Yay!
First things first, buy a bag of corn husks, soak your corn husks in hot water, & completely submerge. If you do this the day ahead even better... they should soak for at least 5 hrs.
(Remember to remove any corn hairs from the husks)
 The water should remain hot the entire time, even if it means changing it.

 So guess what? (I've helped make them for many years).. BUT..This was actually my first time making tamales by myself, I resisted all help, in order to see if I could make them alone.  Yes, I succeed. A very exhausted me succeeded. 
Will I make 10 lbs of tamales alone again? Probably not!
I made 3 different kinds, Rajas, Green Chile Chicken & Chicken & veggies (for the kids). I'm showing you the Rajas (green chile & cheese) tamales... my favorite!

Note: Apply some weight to the husks, like I did. Soaking them makes them more pliable
 (kinda brings them back to life)


RECIPE:
Prepared Masa (from your fav. market) Lets be easy on ourselves!
I bought it from a small market & they prepare it in front of me.
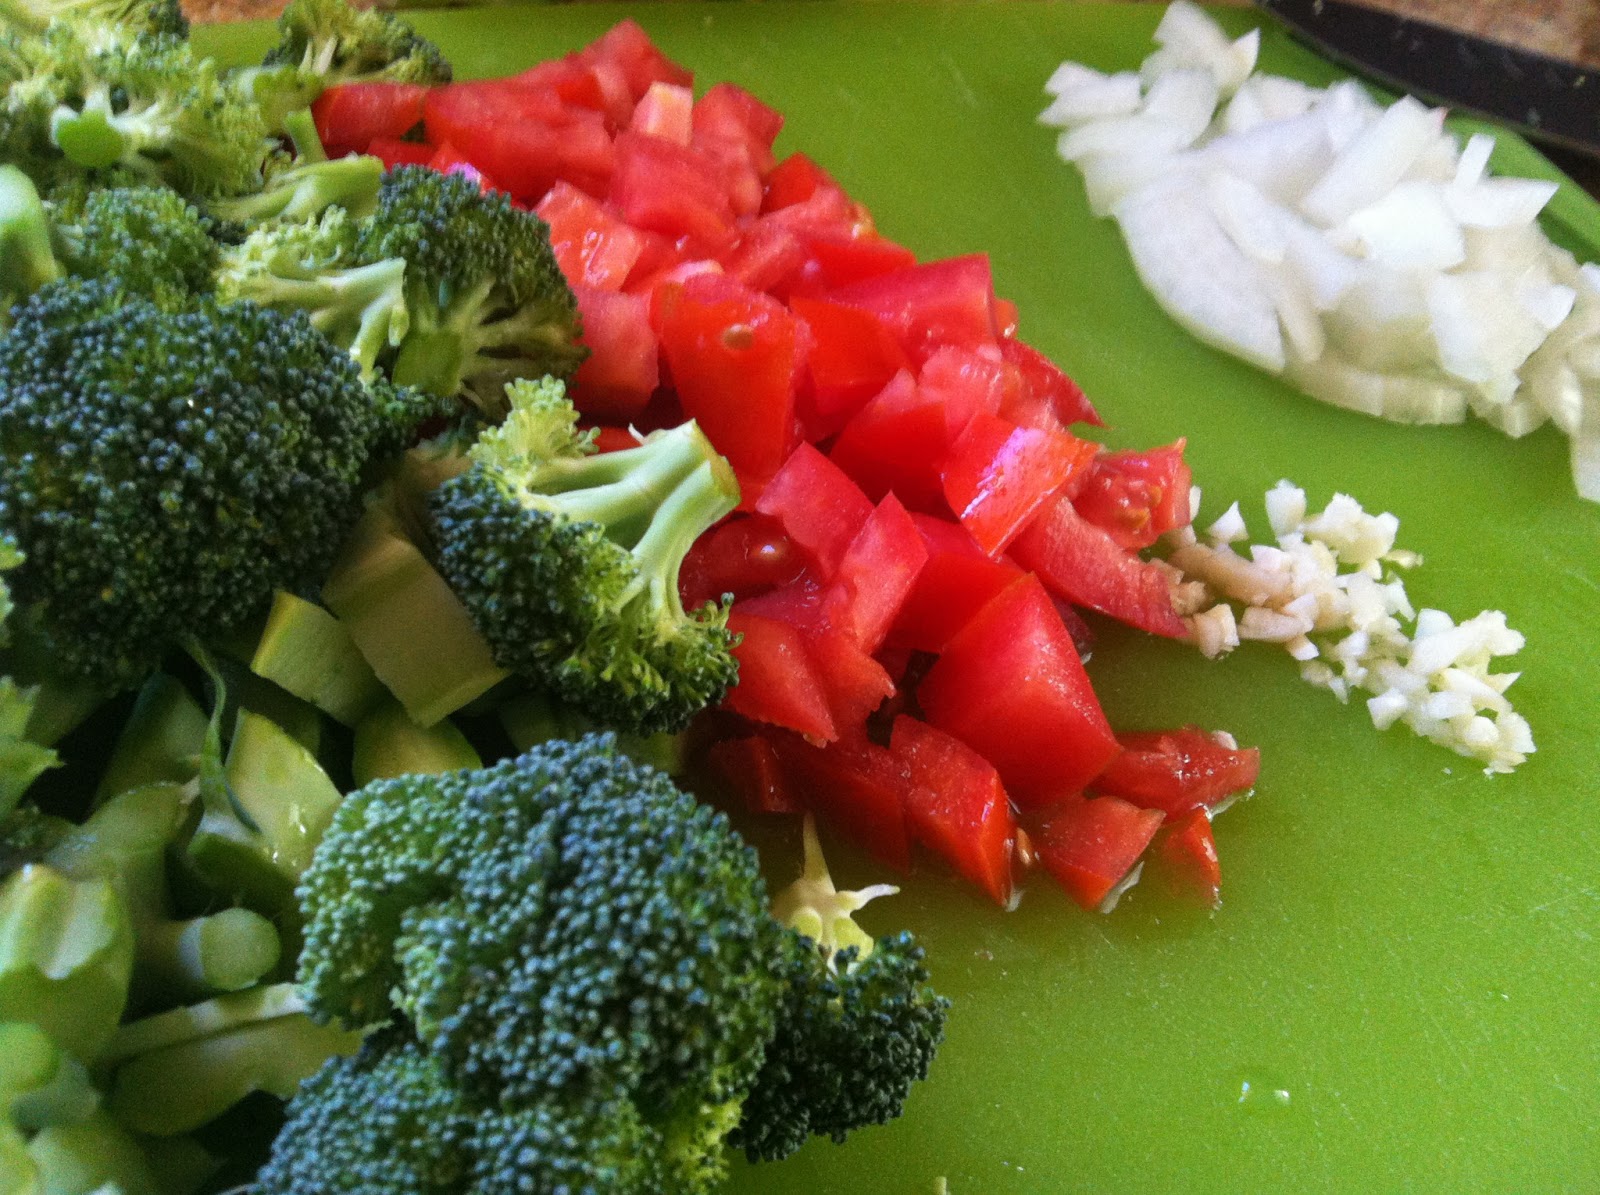
5-6 poblano 
6 Jalapeno
6 Serranos
1- 2 onions
Lots of cheese, Monterrey, Chihuahua cheese (this is a stronger mexican cheese & melts great), queso ranchero (or fresco).. use equal portions of each. The varieties of cheeses is what makes these tamales unique! Use about 1/2 lb. of each, maybe more.

I used 3 types of chiles & 3 types of cheeses... the more variety the more tasty. In my opinion!
Gather up your fresh peppers, 4-5 poblano, 6 jalapeno & 6 serrano (for heat). Begin to thinly slice all of these lengthwise. Use 1 extra large onion (or 2 regular size) .. thinly sliced. Lets talk masa!! I bought 10 lbs. But I made 3 different kinds. For this recipe about 4 lbs with be plenty. 

Note: Don't skimp on your chiles & buy canned.. not the same!

Heat up your largest skillet with a bit of oil. Saute your onion first until slightly tender. Add all your chiles & saute until tender. Remembering they will continue to cook in the tamales. 


They have slightly changed color. Season when a bit of salt. (Remember the cheese has a good salt content)

Note: These Rajas for the most part turn out spicy, if your a heat seeker... this recipe is for you!

 Add all your cheese... It should look something like this! Lots of cheese!
Turn the heat off & your ready to start!!

Note: By melting the cheese into the peppers, less work later, melts better & flavors combine.


Take your corn husks out of the water & allow to somewhat dry. 
Place the masa on a flat baking sheet with edges. 
Flatten it & place a dry corn husk on top (smooth side up). Grab a spoon!

Note: If you apply the masa on the rough side, later when the tamales are fully cooked.. they won't release as easily.


Rub masa on 3/4 (bottom portion of the husk) a good layer. 
Not to thin & not to thick. We want the filling to shine, not the masa.


Grab some filling & place in the center! 


How to fold: Overlap both sides on to eachother closing the tamale. 
Fold the top over & voila!!! You just made your first tamale.

Note: Pinch the bottom opening, to insure nothing drips out.


This made about 25- 30 Tamales... I forget. 


Here's the secret.. you need a large pot with a rack on the bottom. (If you don't have a rack, arrange forks on the bottom to give you some height.) Giving you about half to an inch or so of height. First you will need to boil enough water to almost submerge the rack. The water must be boiling! 
Arrange your tamales like so... Leaving a gap in the center for the steam.

Note: If the water isn't boiling.. 
according the professional (my mom) the tamale will lose it's shape.


Once all the tamales are in your pot. Carefully pour the water in the center


Soak a cloth & cover the top of your tamales & place the lid on. Set the heat on medium-high for 45 mins to 1 hour! (If at any point your water has evaporated, boil more & pour it in.. if you don't your tamales will burn) Checking after the 45 mins. If the top tamales easily releases from the husk, they are done. 
If they don't, cover them up & cook a little longer.

Note: The warm cloth insures all the steam stays put & the tamales will cook more evenly.

We all have our own family recipes..Hope you enjoyed this how to & try this recipe out. If at any moment you feel lost or confused, leave me a comment.

ENJOY!! 
 Reflections: These are very time consuming, not too difficult. The cooking process is definitely the key to successful tamales. 

Wednesday, January 23

Broccoli Frittata

RECIPE:
1 small head of broccoli (chopped small)
1 tomato (chopped)
2 slices of onion (chopped)
1 garlic clove (minced)
5 eggs
about 1 cup or so of cheese 
(I used an Italian Blend, Parm, Romano, Fontina & mozzerella)

 When I decided on making a Frittata.. I checked my refrigerator to see what veggies I had on hand. Went from there. This should feed about 3-4 people. Chopped my broccoli, tomato, onion & garlic. Preheat oven at 350. 
Heat up a large skillet & add some olive oil. 
Add your onions & garlic, cook until translucent or about 4mins. Add broccoli, season with salt & pepper, cook until almost tender. About 5 mins.


 In a bowl combine 5 eggs, a splash of milk, a bit pepper. Set aside.

Finally add the tomatoes & cook for 1 min. Turn heat off.
 

Add some cheese to your egg mixture & combine. Butter a round baking dish, add some eggs & all the veggies, top with the remaining egg mixture & cheese. Cover & place in the oven.


Bake for about 30 min... uncover & bake another 5mins.

Remove from the oven & let it cool for 10mins. 


What you add in your Frittata is completely up to you, personalize it!
 The steps & cooking time are still the same! 
Enjoy!!

Long Island Ice tea (my way)

These are dangerously good! Drink Responsibly! Yes I omitted the gin & it was still delicious.

RECIPE:
Pretty tall glass (fill with ice to the top)
1 shot Tequila
1 shot Vodka
1 shot Bacardi Rum
1 1/2 shot sweet & sour
Splash of coke!

Mix & serve!

Wednesday, January 16

Whole Roasted Chicken


I've made & shared the recipe for whole chicken's before... I know! Why this one... well the difference is I accidentally roasted this chicken upside down or breast side down. This may or may not be ok!! But guess what... it turned out amazing, best part the breasts were very juicy.
 
 
RECIPE:
1 whole head of garlic (minced)
1 tsp. Paprika (for color)
1 tsp. Dried Thyme
Enough extra virgin olive oil to form a paste.. about 1/4 cup! 
 
Combine all ingredients in a small bowl! Preheat oven at 350.
Wash your chicken, I did anyways! Pat dry for a crispy skin. Rub entire paste onto the chicken. Lastly sprinkle generously with salt all over & some freshly ground pepper. Place breast side down cover with foil & throw into your oven.
 
1 hour later... after you bathed your kids or took a shower... drank a corona.. napped.. whatever.
Go back to your oven open & undercover your chicken & raise the temperature to 450 for another 25 mins. This will brown the top!
Lastly, take out your chicken, set on your stove & loosely cover with foil.
Let it rest for 15 to 20 mins... to insure you have a juicy chicken.
 

I chopped my chicken up into pieces for easy serving!


ENJOY!